10 core stability exercises for your baby with Down syndrome - tummy time to crawling

Help us #MakeItHappen!
Core muscle and balance exercises
Go down the list and find the first level that they would struggle with. This is your starting point. Work on that skill until they can manage it. If they can’t manage a certain exercise, move them back a section or move onto the next section. You can be practising several exercises/ activities at the same time to be more effective.
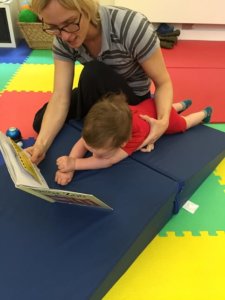
Tummy Time is a brilliant position for strengthening your child’s neck and back. It should become a vey regular part of your baby’s routine – aiming for about an hour per day (in total) if you can fit this in. They may not enjoy this to start with but build up the time slowly. They will enjoy this more and more as they get stronger and it is a crucial step towards crawling.
If they don’t tolerate tummy time on the floor, start with them lying on your chest on their tummy and with you lying back so they are doing tummy time on an incline. Encourage them to look up to see your face. Whenever they look up, they are working their neck and their back.
If they tolerate this well, move them onto a sofa on their tummy. Sit on the floor in front of them so that they are at your head height and sing or talk to them to encourage them to look up.
Move them onto the floor on a soft mat. Get down on the floor with them so they feel more confident and can still see your face.
When they are lifting their head quite well, try bringing their arms under them so they are leaning on their elbows. They should have their shoulders over their elbows.
Use a rolled up towel or wedge under their chest to help them to push up on their elbows or hands. Read them a book or they can watch TV here so they are motivated to keep looking up and pushing through their hands or elbows.
Next try to encourage them to push up higher on their elbows or hands. Use a bigger roll under their chest to help them if they need it. Put toys higher so they have to push up to see them.
Once they can prop well on elbows or hands, encourage them to reach forward with 1 hand to play.
Once they can do this and happily weight bear on the other arm, bring toys out to the side slightly out of reach to encourage them to pivot around on their tummy to get the toy.
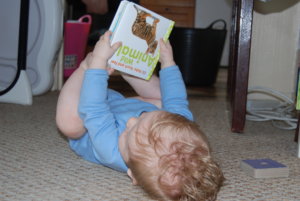 This is a brilliant position for strengthening the tummy which is so often weak in our babies.
With your baby lying on their back, encourage them to touch their toes.
You could put bells or beads on their feet and help them bring their feet up in the air for the child to reach towards their toes. To start with you can help them move their hands towards their feet but try to get them to reach themselves as soon as possible.
Start with the left hand reaching for the left foot.
If they struggle bringing their feet up, place a small rolled up towel under their bottom so their feet are already off the floor. This will make it easier for them to bring their feet towards their hands.
You could also roll up a towel and put it under their head and shoulders to help them see what they are doing and bring their arms off the floor. This should be as if they are in an inflatable ring rather than just propped up on a pillow to encourage the best movement. They could also play with a baby gym to encourage reaching up or kicking toys up in the air.
Once they can touch right hand to right foot, practice touching the opposite foot.
As they get stronger, take the towel from under their head/ shoulder and bottom to challenge them further.
Allow them to play like this in just their nappy and encourage them to touch their hands to hands, hands to tummy and to the rest of their body. Name what they are touching to start to teach them about their bodies to give them body awareness which is crucial for learning more complex skills in the future.
Help them onto their side with their hips and knees bent.
To start with just give them a toy so they are playing with it with their 2 hands.
You can roll up a long towel and run it down behind their head and back, in between their legs and up against their tummy, in a U shape, so they can stay in this position without your help.
When they appear comfortable and happy in their position, see if they can hold this position on their own. Use a toy to help them come more forward or more back. This will start to introduce a little rotation into their body.
Encourage further reaching backwards or forwards until they roll onto their back or tummy.
Try to roll onto their side from their back by them bringing their legs into the air and then reaching towards a toy to their side.
 Rolling is key to incorporate those rotation muscles.
 Encourage rolling using toys. Rolling starts with looking to the side and reaching for a toy so move the toy to the side to encourage them to follow.
You may want to help them if they are struggling on their own. Hold them by one leg so they are moving the rest of their bodies themselves.
Follow this sequence to help your child roll:
Rolling from back to front to back going right.
Use a toy to make them reach with their left arm across their body towards their right side.
Bring their left leg bent up towards their chest and then across their body towards the right until they are coming onto their tummy.
Let the leg straighten out and allow them to sort out their arms or help them bring their right arm out from under them so they have their 2 arms free on their tummy.
To get back onto their back, make sure the left arm is straight out in front of them above their head or, if they can, propped up on their elbows or hands.
Bring the right leg bent up towards their chest and use a toy to help them reach back with their right arm to help them roll onto their back again.
Practice until they manage this on their own.
Use rolling around the floor as much as possible – putting toys out of reach – so they strengthen their core muscles as much as possible.
This is a brilliant exercise for strengthening our children’s tummies and necks – often much weaker for our children with DS.
When your baby is small, sit on the floor with your knees up and sit your baby on your knees.
Hold them by their shoulders with your hands over their shoulders but your forefinger from each hand hovering behind their head – ready to catch their head if necessary.
Start to tip them backwards very slowly so they have to hold their head up for themselves. Hold the position for a few seconds before going further back and see if they can hold their heads on their own. If their head falls back, come back up to sitting and start again.
The aim is to be able to lower them bit by bit with them holding their head until they are lying on their back. This is working their neck but also their stomach as the 2 are closely linked.
As they get bigger it may be easier to do this with them sitting on the floor or sofa instead of on your knees. The key is that they can always see you so you can keep their attention by chatting or singing so that they keep their chin tucked down to help them hold their head.
Once they have full head control, you can do this activity by just holding their hands. They must be holding onto your hands and be pulling up on your hands to protect their shoulders. Go up and down slowly from lying to sitting and back to lying to work their tummy brilliantly in an adapted sit up.
It is the opinion of some experts that our children shouldn’t practice sitting until they can get themselves into sitting on their own. If they can get into sitting themselves, it is likely that their core strength will be good enough to prevent them compensating with other muscles to be active in sitting.
For our children with DS, rotation is more difficult than any other movement so is often avoided. This activity strengthens the rotation muscles brilliantly in preparation for great core stability.
This should be attempted once they can prop up on their hands in tummy time and when they can pull to sit holding onto your hands (see above).
Sitting up via their left side.
Start with your child in lying on their back.
Sit or kneel on the floor at their feet.
Use your left hand on their right hip to be ready to help them come up.
Take their right hand with your right hand.
Slowly pull up with their right hand in the direction of their left hip so that they roll a little onto their left side and can start to push up off the floor using their left hand. You may need to show them this to begin with.
Keep pulling up now as they push up. Use your other hand to start to push down on their right hip to anchor it to the floor to make it easier for them to come up.
Finish in sitting on the floor.
Do the opposite to go back down onto the floor.
Try both sides to strengthen the full tummy.
Find a way to try to incorporate this regularly into their life. This can be great for nappy change time or every time you are picking them up off the floor.
This is a fabulous position to work the core. This position should be attempted once your child can push up fully on their arms in tummy time and can reach for their toes when lying on their back. It should be tried at the same time as lie to sit via side lying and at the same time as starting to sit.
Hands and knees is an essential step towards crawling which is the ‘gold standard’ for children with DS.
Start with your child on hands and knees over your leg (with your leg going between their 2 hands and their 2 legs. Use the narrower part of your leg if they are too small to reach over your thighs.
Encourage them to push through their hands to look up.
Next try to lift 1 hand to play.
If they are confident at this, move their whole body further forward over your leg so they have more weight over their arms.
Try to lift 1 hand again.
Move them further forward again and lift 1 hand again.
One they can manage this, try the kneeling position but with their bottoms sat down on their heels so they don’t have so much weight on their hands.
Try lifting 1 hand again.
Now bring their body a little more forward so they have more weight going through their hands. Can they lift a hand here?
When they seem strong enough, bring their weight forward so that their shoulders are right over their hands and their hips are fully over their knees. Try balancing here and eventually lifting 1 arm to play.
Our children may try and compensate by dropping their tummy’s so pass toys under their tummy so they have to lift it up or poke them upwards in their tummy to encourage them to lift their tummy which is much better for their core stability.
Sitting is the first great test of core stability. To have full dynamic sitting balance, our children need all their core muscles to work nicely together. Therefore, it is important to work on the preceding exercises to make sure your child is ready for sitting.
There are several different floor sitting positions. Each works the core in slightly different ways so each one is worth practicing. Sitting can be in ring sit (with their hips wide and knees a bit bent) side sitting (both legs going off to one side and leaning through the opposite arm), long sitting (with legs straight out in front) or crossed leg sitting (try alternating which is the top leg).
Start by helping them into the position and slowly reduce your support to see if they can stay still. If you need distractions, watching or reading are good as they can stay still for these without having to use their arms.
Hold them at their hips and when they start to topple, rather than propping them back up, just pull down on the opposite side of their body to the direction they have fallen and see if they can bring themselves back up again.
Once they can stay still without using their arms, move on to playing with them so that they are using their hands but still staying upright.
Next, move on to reaching outside their base of support – side to side, in front or rotating to reach behind them.
You could also play ‘stuck like glue’ where they have to try and stay upright and you try (gently) to push them over.
Once they can sit on the floor, try sitting them up over your leg, sat astride a roll or on a bench so their feet are flat on the floor but their bodies are not supported by furniture.
Hold them by their chest to start with and try to move your hands towards their hips as their balance improves. As they adjust to this stay close so you can help them if they fall. They can watch or read something in this position so they don’t have to use their hands. Use this position for a regular activity to get lots and lots of practice in.
When they are able to balance when they are still, challenge them by encouraging them to reach out to the side for a toy, reaching to the floor and back up or trying to reach out behind them to challenge their core and their balance.
Children with DS love to have straight legs and find bent legs more difficult. These positions are brilliant for teaching their legs how to get more stable. Make sure their knees stay bent while you do these activities, so they start to use their legs in a bent position to balance themselves. Hols them at their knees or feet to help them keep knees bent.
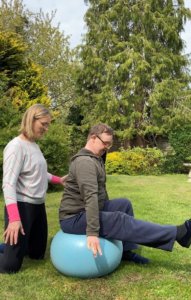 Once your child has sitting balance on the floor or on the bench/roll, you could try working some sitting balance on a moving object. This could be on a wobble cushion, on a gym ball or, if they fit on your lap, you could move your legs as the moving surface.
 If you are using the ball, make sure you have complete control of the ball and your child to try this – it may take 2 adults. If you are using the ball, you can wedge it into the corner of the room to make it more stable until you are more confident in your handling.
Hold them at their hips so you have control of their bottom on the ball. Very slowly, move the ball in all directions.
As they get more confident you can move in bigger OR faster movements. Hold the position at the extreme of where they can go to make it a little harder but have a second person ready to catch them if they fall.
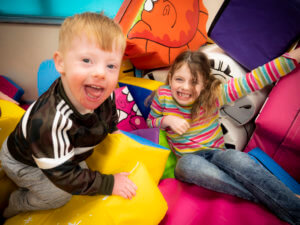 This is a brilliant activity for the core but it is also fantastic for pelvic and shoulder stability, for working joints in mid range (difficult for children with DS) and encourages the 2 sides of the brain to work together which is great for coordination. It is therefore THE BEST activity that babies and young children with DS can do in their development.
Our children need to be able to hold their hands and knees position with confidence and be able to lift 1 arm before they try to crawl.
Once your child can lift 1 arm in hands and knees, move a toy just out of reach in front of them to encourage them to reach forward. Help them at their legs to bring 1 knee forward as they move the opposite hand forward.
Repeat this with the other hand/ foot until they start to move forward on their own.
It may be easiest to practice this with them sitting back on their heels again until they are more confident.
Once they can crawl forward confidently, put obstacles in their way for them to crawl around or over.
Use slopes or uneven surfaces (like grass) to challenge them further.
When they are crawling confidently, try crawling up the stairs. Let them reach up with their hands while you give them a little help with their legs.
If possible, allow them to become expert crawlers BEFORE trying to stand and walk. The more time they are crawling, the better for their bodies and physical development.
See our balance section for more details.
Once they have managed all these exercises see our more advanced core exercises for the next in the sequence.


